
Tips / How to...
This page provides info on making the most of The Backyards.
Topics (Tap/click an item below to skip to the related tips)
0. Getting started
Take a look at the 2-page Quick Reference guide (tap to open in a new window).
This is also available from within the tool:
- Tap the logo (top left) - opens a window with extra info.
- Tap the link provided to the Quick Reference guide.
Wish to try it with some animal data already loaded? Open the demo (in a new window)
There's help available throughout the tool - tap the relevant i button.
1. Loading data
One way to assess the quality of a livestock Session data file (from a weigh head unit or stock wand) is by identifying how many trait values are missing. A fast way to do this:
- Tap Load Data from the main page.
- Ensure the Session data option is selected.
- Tap Select (csv) file and choose the required Session file. The profile of the file is displayed by Data field/trait.
- For each field/trait, compare the number that have a value against the total number of Stock identified in the file. Significant discrepancies indicates the extent of missing trait values.
Choose to continue with loading the file (or Cancel if you wish to adjust the file content before loading).
Session data with up to 3 animal traits can be added directly into your databank with just your phone and a compatible stock wand - no weigh head unit is required. Here's how:
- Tap Load Data from the main page.
- Ensure the Session data option is selected.
- Tap Create Session.
Requires a compatible stock wand to be connected to your phone(/tablet/laptop) via Bluetooth™ (tap the info button next to Create list for details). - Select the Field/trait(s) you wish to use that Session e.g. Foot root score (or add a new trait). Caters for up to 3 fields/traits per Session.
- Wand each animal and select the appropriate value(s).
- Once data has been recorded for all the required animals: Tap Load Session.
- Add a name for the Session load and tap Load this data.
NOTE: If there'll be no internet access on location, simply login before heading out to the field. (When back in range, and reconnected to the internet, the changes made will automatically be uploaded.)
It's fast and easy to assign stock to a group within your databank with just your device and a stock wand.
- Tap Load data from the main page, then choose the Group list option.
Requires a compatible stock wand to be connected to your phone(/tablet/laptop) via Bluetooth™ (tap the info button next to Create list for details). - Wand the animal tags you wish to be added to a Group.
- Once all the required tags have been wanded: Select Load list.
- Select an existing Group or specify a new Group.
- Add a name for the data load and tap Load this data.
NOTE: If there'll be no internet access on location, simply login before heading out to the field. (When back in range, and reconnected to the internet, the changes made will automatically be uploaded.)
Details of every data load are retained and easily viewed:
- Tap Load Data from the main page.
- Ensure the Session data option is selected.
- Tap View prior loads - details of the loads (including source) is displayed.
FYI: The last 10 data loads (any type) are listed on the main page too.
Animals that have been sold or are dead can be flagged as such in your databank and are automatically filtered from the list of active Stock.
(Details are still accessible if needed via Animal History.)
- Tap Sales and Deaths from the main page.
- Select the relevant option Sold list or Dead list.
EITHER load an existing list of IDs:
- Tap Select (csv) file.
- Select a file.
- Review the file overview & tap Load this datails (or cancel).
OR Create a list of IDs using a compatible stock wand (connected to the device via BlueToothTM):
- Tap Create list.
- Obtain the animal ID by wanding the tag.
- Once all the required animals have been wanded: Select Load list.
Keep one hand free for data entry or stockhandling by using a wrist/arm band holder for your phone, or attached to the stock-wand via a detachable (or adhesive) bike mount, so that the tech is on the same arm.
2. Filter drafting (criteria matching)
The example here assumes ewes, but the principle applies to any stock type and assumes Session data with pregnancy data* has been loaded.
- On the main window, select Filter Drafting.
- In the Data fields section, select Pregnancy and choose "= 2".
Optionally add other criteria (e.g. Condition score > 3 ) and/or filter by Group. - Select the Session data load(s) to source from (+ choose and vs. or depending on your objective).
- Tap Retrieve matching Stock to identify the number of animals matching the criteria.
- Tap Create drafting file to generate a CSV file of the tag IDs - this can be loaded into a weigh-head unit or stock wand for drafting).
OR
Choose to load the IDs as a Group list to assign these to a group within your databank.
* If a pregnancy flag (Wet/dry or Yes/No) is loaded instead of a count, then step 2 involves selecting the flag to filter on.
If "average" or "poor" performers are sought, then adjust the criteria accordingly.
Identifying which stock are due can be helpful to ensure the applicable feed regime and that they're in the right location when they're due.
- Tap Filter Drafting from the main page.
- In the Data fields, select Foetal Age and choose "Early".
- Select the Session data load(s) to source from (+ choose and vs. or depending on your objective).
- Tap Retrieve matching Stock to identify the number of animals matching the criteria.
- Tap Create drafting file to generate a CSV file of the tag IDs - this can be loaded into a weigh-head unit or stock wand for drafting).
OR
Choose to load the IDs as a Group list to assign these to a group within your databank.
NOTE: The example assumes pregnancy Session data has been loaded and includes an Early, Mid or Late trait value for those pregnant.
Want to draft animals based on one or more traits (e.g. Condition score)? (Tap/click for details...)
- On the main window, select Filter Drafting.
- In the Data fields section, select the required trait e.g. Condition. Select between "<", ">", "=" or "≠" and the Score value to filter on.
Optionally add other criteria (e.g. Weight < x ) and/or filter by Group. - Select the Session data load(s) to source from (+ choose and vs. or depending on your objective).
- Tap Retrieve matching Stock to identify the number of animals matching the criteria.
- Tap Create drafting file to generate a CSV file of the tag IDs - this can be loaded into a weigh-head unit or stock wand for drafting).
OR
Choose to load the IDs as a Group list to assign these to a group within your databank.
NOTE: The example assumes Session data that includes Condition score values has been loaded.
3. Animal History
Viewing the trait data loaded for an animal is fast and easy.
- Tap Animal History on the main page.
EITHER: use a compatible stock wand (connected to the device via BlueToothTM):
- Wand the animal.
- All the trait information loaded will be displayed.
OR by selecting an ID:
- Select the Visual ID (if loaded) or electronic ID. (Narrow the list if needed by the last few characters or selecting a defined Group).
- All the trait information loaded will be displayed.
Changing a trait value is easy:
- Tap Animal History from the main page.
- Retrieve the animal data (via Wand or ID - see the tip above).
- Tap the trait value you wish to change.
- Make the change and save it.
NOTE: If the value came from a Session data file, you may also wish to update the data on the original source of the file (e.g. a weigh-head unit) to keep them aligned.
- Tap Data Fields and Groups from the main page.
- In the table of Data Fields, tap the ^ icon to change the display order of a Field.
4. "Ghost" animals
(Animals with no new data since...)
Want to exclude "ghost" animals from your active data? (i.e. Those not scanned in the past "x" months.)
- On the main window, tap Ghost tags.
- Select the required period (3, 6, 9, 12, 18 or 24 months) since the last info for the tag. This displays a list of tag IDs not scanned in that period.
- Use the provided option to flag these as ghosts.
NOTE: This example assumes data loads have already been performed.
The IDs flagged as ghosts are automatically filtered from the list of active animals - but can still be found (and re-activated if needed) via Animal History.
If a subsequent Session data load includes the ID, the ghost flag is automatically removed and the animal status reverts back to active.
Ghost IDs might be useful to clean old data from weigh-head units and/or existing spreadsheets.
To generate a list of these:
- On the main window, tap the export icon (✈) alongside the Logged active tags.
- Check the Ghost option and tap Create export file.
This generates a CSV file with a list of IDs of the stock that have been flagged as ghosts.
If the Ghost "flag" feature has been used (see tip above), the status of an individual animal can be changed back to active:
- Tap Animal History on the main menu.
- Wand the animal (if a compatible stock wand is connected).
OR
Locate it by ID (uncheck the Use wand option if needed). Check the option to "include ghosts". - Tap Change detail for the selected animal.
- Choose the option to change the staus back to active and tap Re-activate.
To reactivate multiple animals: Load a Group list of the IDs i.e.
- Tap Load data on the main page and select Group list.
- Load a CSV file of the IDs (or use Create list - with a compatible stock-wand connected - to wand each of the animals.
- When loading the Group list, use something like "Newly seen mm/yyyy" for the Group name.
Loading the Group list changes the status back to active for all of the included tag IDs.
NOTE: For newer Session data loaded after the ID was flagged as a ghost automatically reverts the animal status back to active.
5. Fields and Groups
Fields = animal traits, Group = animal marking
- Tap Data Fields and Groups on the main menu.
- Tap the associated number value in the # of Loads column.
This opens a window listing the Session data loads that included values for that Field/trait.
- Tap Data Fields and Groups on the main menu.
- Tap the associated number value in the # of Vals. column.
This opens a window listing the unique values loaded for that trait.
NOTE: All instances of specific trait value stored can be changed via Edit values.
New Data fields/traits are automatically added when included in a Session data file (via Load data on the main page). Loading from a Session data file creates or extends the range of known unique values for that Field/trait.
New Data fields can also be added manually in two ways:
- Tap Data Fields and Groups on the main menu.
- Tap Add field.
This method simply adds a Field for future use on the main page (and does not specify the range of possible values).
A Data field can also be added when creating a Session directly into your databank. This method is more comprehensive and allows the range of values to also be specified:
- Tap Load data from the main page, and ensure the Session data option is selected.
If needed, connect a compatible stock wand to your phone/tablet/laptop via Bluetooth™ (tap the info button next to Create Session for details). - Tap Create Session.
- For Data Field select [Add field] & tap the Use for Session icon.
- Select the type of values for the Field.
"Stepped numbers" for a range of values, "List" for some label options (e.g. "Good", "Average", "Bad" or perhaps "Yes", "No") or a "Value" that allows a unique value to be added per animal per session.
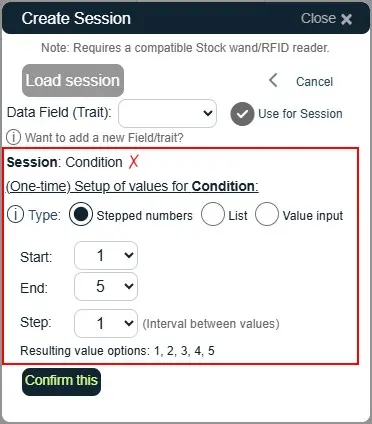
- Tap "Confirm this" when ready to display a confirmation window - tap the "Looks good" option to save.
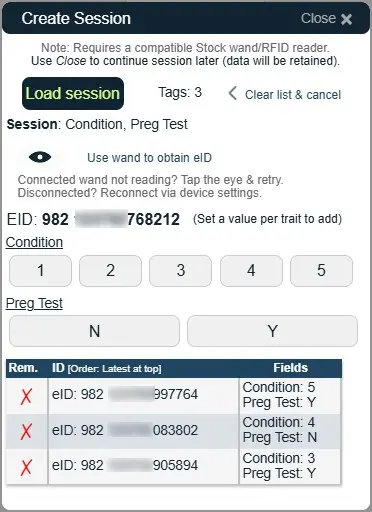
Once all the Fields required for the Session are selected (up to 3), the collection of Session data can begin with the relevant value options are presented.
Each animal can be assigned to any number of groups - it's like marking an animal for some purpose.
Group assignment(s) can be used as a filter when create Drafting files or in Animal History for narrowing the list of IDs when locating an animal to view.
Multiple animals can be assigned to a group:
- via Data Load when loading Session data, a Group list or VID:eID list:
* Use Assign to Group. - via Filter Drafting if the Load as Group list option is used (once stock matching the criteria are retrieved):
* Use Assign to Group.
An animal can also be assigned to a Group individually:
- Tap Animal History on the main menu.
- Wand the animal (if a compatible stock wand is connected).
OR
Locate it by ID (uncheck the Use wand option if needed). - Tap Change detail for the selected animal.
- Choose the Add to Group option.
- Select the required group (or create a new Group).
- Tap the Add to Group button.
Each animal can be assigned to any number of groups - it's like marking an animal for some purpose.
Group assignment(s) can be used as a filter when create Drafting files or in Animal History for narrowing the list of IDs when locating an animal to view.
A new Group name/label can be created in various spots:
- via Fields and Groups:
a. Ensure the Groups option is selected.
b. Tap Add Group. - via Data Load when loading Session data, a Group list or VID:eID list:
* Use Assign to Group.
* Select "[New Group]". - via Filter Drafting if the Load as Group list option is used once stock matching the criteria are retrieved:
* Use Assign to Group.
* Select "[New Group]". - via Animal History > Change detail:
* Use the Add to Group option.
* Select "[New Group]".
The name of a Group can be also be modified/adjusted:
- Tap Fields and Groups on the main page.
- Ensure the Groups option is selected.
- Tap the ✎ icon alongside the Group label to be changed.
- Adjust the label and tap Save Group label.
6. Adjusting loads and data
If you've inadvertently loaded the wrong data, it's easy to reverse:
- Tap Adjust loads on the main menu.
- Tap the Remove loaded content option.
- Check the correct type of file content is selected (i.e. Session data) - a list of data loads is displayed.
- Tap the remove (X) option for the file not wanted.
It's easy to adjust the details of a data load. This includes:
- the "Short Name" or "Description" of the load.
- the Stock type (if no other loads contains the IDs) - Session data only.
- the Group assigned (add, change or remove), if applicable.
- remove some of the loaded Data fields/traits - Session data only.
Here's how:
- Tap Adjust loads on the main menu.
- Tap the Change details of a load option.
- Select the relevant "Content type" for the load you wish to change.
- Tap the ✎ icon alongside the load to be adjusted.
- Change the required item(s).
- Tap Adjust load details.
7. Other/General
The tool caters for a variety of Stock types e.g Sheep, Cattle, Pigs, Deer, Goats, Alpaca & Bison. To enable another stock type:
- Tap Options.
- Check the required stock type (and go back to main menu).
Load data, Filter draft, view Animal History etc separately per stock type.
Switching between stock types is easy: simply choose the required one at the top of the screen.
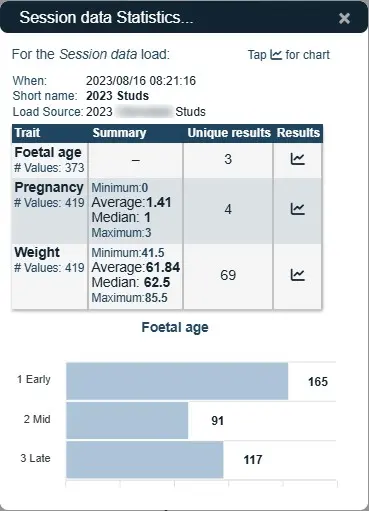
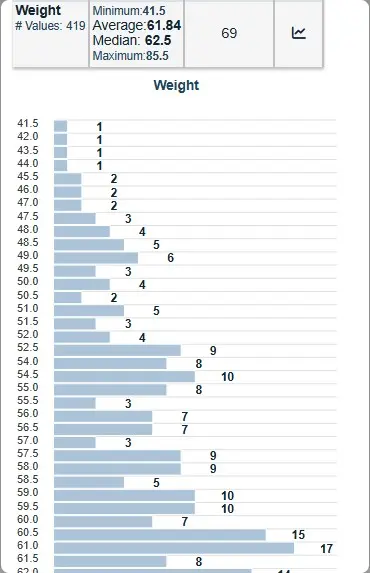
When Session data is loaded, statistics are auto-calculated for each animal trait.
Simply tap the ∑ icon alongside a listed Session data load. (e.g. Last data loads table on the main page, View prior loads via Load Data.)
Here's a couple of examples for numeric and non-numeric fields/traits.
Any data loaded can be exported to a CSV file.
Simply tap the export icon (✈) alongside a listed load. (e.g. from the Last data loads table on the main page, View prior loads via the Load Data page, or Sales and Deaths page.)
In Filter Drafting if only a single source file is selected, the subset of the load that matches the selected criteria can also be exported.
The tool seamlessly handles the change for stock data files loaded from different brands of equipment. This means there's no need to lose data when making equipment changes.
Even though the CSV files from different brands of equipment sometimes use different field/header names, the tool can handle the differences via "aliases". Tap Data Fields and Groups and view the help icon for more details.
In most cases, using the export option for data loads from the prior equipment brand generates a CSV file that can be loaded into the new brand of equipment.
- Tap your Farm/station name in the titlebar: the Stock Unit credit details are displayed.
- Select a month to see the exact dates that credits expire annually.
To see which loads consumed Stock Unit credits:
- Tap the Member icon in the header.
- Tap View Stock Unit credit usage.
- Review the list of data loads (and/or annual renewals) for the credits used.

© The Backyards Ltd . All rights reserved.